Pre-Production
- Chris Sellers and I had a desire to create some-sort of animation project with blender. We felt that this would be an appropriate challenge. However, we were fairly unsure how to approach such an ordeal because we were not animation students, but video students. After much consultation, we decided to create a music video based on an environment we create independently. We had planned some side-angles, dolley shots, birds eye views, and numerous pans across our environment. Below is an example of one of our pre-production papers. However, because we had no understanding of animation beforehand, we had to watch a minimum of 4-6 hours of tutorials to grasp the basic interface and shortcuts of blender.

|
Production
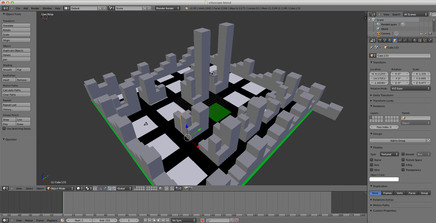
Then we went about creating our environment on blender which took a ridiculous amount of time. (Approximately 10-12 hours) We had to individually craft every single block and manipulate it depending on the scale of the environment we desired. After creating the surface and foundation, we created our simple stick figures to represent the people. However, due to our limited ability, we were not able to make them elaborate. And we were also unsure as to how to move them into our environment. Although later, we did learn how to copy and recreate objects in order to reduce the amount of time required to create multiple objects. Below is an simplistic version of the early foundation of our environment. (Although simple, this task took us hours.)
|
Post Production
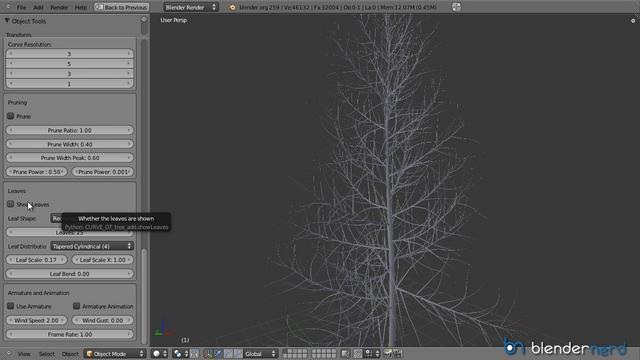
As we finally finished our environment, we begun placing in small specific details by creating small objects that we could then append into the software. (Appending is a technique we learned that is when one mixes two objects inside of a blender file into one file.)Thus, we no longer had to be together to work on our environment because we could create an individual object separately and later append them into the file of the environment itself. For example, this tree that I created for the environment. (This was not placed into the project however due to size constraints)
Then, as progressed further, we created a short JPG sequence. We then learned how to import the sequences into Final Cut Pro. When we exported the final product however, we saw that the video had numerous glitches and flashes. Some were lighting issues, so we had to redo numerous angles and fix overlaying objects, while importing new objects. Because we learned through research that when objects overlay inside of an environment, the final product will have blinking when you make camera shots.
|
Publishing
And as we finished up our final touches, such as the additions of small objects and the deletion of unnecessary overlaying objects, we began setting up our final angle shots. And have thus created our final product.
|
Inspirational Video
Sintel
|
This quarter we had to present a piece of work that inspired us in the video production field. I chose the Sintel, the third open movie by the Blender Foundation. I chose this because of my second quarter project being an animation. This is one of the most renowned works by blender that has gotten the software publicity and fame. This video really inspired me to continue working in the animation area. Things about the video that inspired me are the elaborate environments and small details. Each and every little groove in the mountain in the beginning scene must've been created independently. In the fight scene, they had to study the movements of aggressive body language to make the fights seem natural. And lastly, the interactions between the main character and the environment themselves must've required careful planning of the shots and movements. These details which are often overlooked require much attention and effort. This is why I commend them and admire them. And ultimately, this has inspired me to become better.
|
